
How do I use MAX to complete my shrimp weight monitoring?
xpertSea MAX has been designed to integrate into existing farm workflows to optimize the work. Most farms conduct a weekly average weight sampling, and this is where MAX comes in for shrimp between 2 and 40g.
Note: we are working to improve the supported ranges, and expect to support the full growout phase soon (down to 0.5g).
The first step in getting rich insights to improve your profitability is taking good pictures with xpertSea MAX on the farm. It is important to take high quality photos from the field to ensure accurate results. This guide will help you understand how to take good photos, common issues faced, and how to avoid them.
Step 1: Ensure you have everything you need
Before you start the process of collecting shrimp to measure, ensure you have everything you need to take the photos. You will need:
3-5 xpertSea trays
A bucket to collect water from the pond
A castnet to get the sample of shrimp
A container to hold the sample of shrimp
A smartphone with xpertSea MAX downloaded to take the photo (for which devices are supported, see the help article on device requirements)
[Optional] An umbrella to cover the tray when taking the photo to avoid issues with the sun
Once you have everything you need, you’re ready to sample all of your ponds.
Step 2: Collect sample of shrimp

The majority of farms do this today, and there is no difference to this part of your workflow when using xpertSea MAX. For larger ponds, this typically means getting in a boat and throwing a cast net in various locations to get a collection of shrimp. These shrimp will need to be brought back to shore, so it’s best to keep them in a bucket of water to ensure no stress is caused to the animals.
If you take the sample in one or two places of the pond, you must keep this form of sampling and do it every time in the same way to unify the method as inconsistent sampling will lead to inconsistent results.
A couple of things to keep in mind when collecting the sample:
Sample multiple locations across the pond: As shrimp as living animals that move around, it’s important to ensure that samples are taken from a variety of locations where the shrimp may be. You know your ponds best, but it’s important to consider things like feeding zones and the depth of the pond when collecting a sample.
Collect enough shrimp: xpertSea recommends collecting at least 150 shrimp to get a representative sample of the pond. It is important to note, that if you are looking to use MAX near harvest to get an accurate view of what the liquidation will look like, it is critical to take a larger sample, between 300-500 animals. Without doing this, there is a very high chance the sample will not be representative of what will be harvested, and the results will not be as useful.
Do not discard animals: Some producers may discard shrimp that are much smaller or bigger than the rest of the sample, but it is important to include all of the shrimp when using MAX as this will lead to more useful insights
Step 3: Put the shrimp into trays
While the sample is being collected, you can prepare your trays for the photo taking. Put about 4 to 6 liters of water in each tray, though the exact volume of water is not critical. The idea is to be able to cover the shrimps completely. It is very important to not put water above the red dots.
Once the shrimps get to you, begin placing them in each tray. You should fill the tray with 50% of its capacity, making sure that you can see all the shrimps individually. For smaller shrimp, you may be able to fit over 50 shrimp per tray, however for larger shrimp, it’s likely you will only be able to fit about 20 shrimp per tray, and need to take more photos to reach a sufficient sample size. To increase the accuracy in the distribution information, you can increase the total number of shrimp sampled.
For a rough idea, here is roughly how many shrimps will fit well in the tray and thus how many photos will be needed for various sizes:
2-5g: 60-80 shrimps, 3 photos
5-10g: 50 shrimps, 3 photos
10-15g: 40 shrimps, 4 photos
20-25g: 30 shrimps, 5 photos
25g+: 20 shrimps, 7-8 photos
Step 4: Take the photos
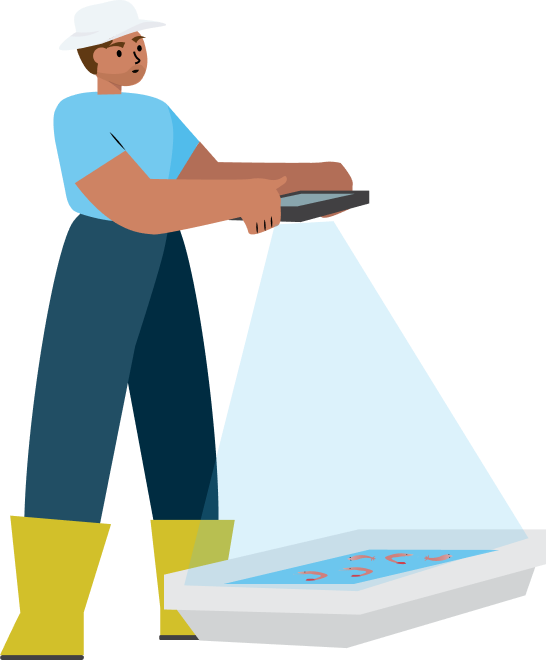
Open the xpertSea MAX application and navigate to the pond you are at. If it is your first time using the application, ensure you have connected to the internet and synced all information to ensure the pond is there.
Once inside the pond you want to monitor, select the “sample” button to take the photos with xpertSea MAX app. You can take multiple photos before saving, simply click the blue arrow to continue to the next photo. Review your pictures before saving them, and re-take photos of any trays if necessary. It is not necessary to be connected to the internet during the sampling, but be sure to ensure the application is open when you have access to an internet network.
Once the pictures are taken, return the shrimp to the pond.
Step 5: Connect to Internet and Get Results
After the photos are taken, the phone will automatically upload the photos and your results will be available quickly after connection. To learn more about how you can use these new insights, check out our post on how you can use MAX to take production decisions.
What do good photos look like?
Here are some examples of good photos, where each shrimp can clearly be seen. To get best results out of MAX, try to take photos like the following:


Even though the computer vision model has been trained to work in field conditions, some situations can cause challenges. Below are some examples of issues with images that can lead to inaccurate results.
Things to remember when taking the photos
Clustering


When shrimp are placed in the tray with water, they often move toward the corners of the tray. When this happens, it can be impossible for the vision model to identify each shrimp. As can be seen in the two images, the shrimp are very clustered together, and the AI has a difficult time (as would any person) visually identifying each shrimp. This can lead to inaccurate results. Make sure you can see the white tray behind each shrimp and that no shrimp are overlapping.
To prevent this, stir the shrimp in the tray right before taking the picture. If this does not work, it may mean you have too many shrimp in the tray and need to put less in.
Sun/light reflection and bad lighting


In very sunny conditions, the water can reflect the sun and cause issues. As well, bad lighting such as partial shadow over the tray or a really dark image can cause issues in getting accurate results.
To prevent these issues, it is recommended to monitor early in the morning before the sun is strong. Alternatively, you can take the photo in a shaded area or use an umbrella to create the necessary shade.
Note: we are actively working on a new functionality that will allow the image to be taken without water, which will eliminate this issue.
Presence of Debris


When there are large chunks of debris in the tray, the computer vision may mistakenly identify a piece of debris as a shrimp, resulting in inaccuracies.
To prevent this, simply remove bigger debris from the tray.
Splashes, ripples, and bubbles


When the water is splashing, there are ripples, or bubbles the image can be harder to pull information from.
To prevent this, wait a few seconds for the shrimps to calm down if they are very active.
Too many shrimp


When too many shrimp are placed in the tray, it will almost definitely lead to some clustering even if the shrimp are stirred.
To prevent this, simply ensure that the tray is not completely full and only about 50% of it contains shrimp.
What should I do if I take a bad image?
If you realize after the sampling on the field is completed that several of the pictures have any of the issues listed above, it is possible that the results will not be as accurate as possible and may negatively impact the accuracy of xpertSea MAX results. In this case, the best option would be to exclude that monitoring and do another one.
If you notice discrepancies in your results, make sure to review your images quality first and at any time, if you have any doubts, please reach out to your xpertSea representative.
To learn more or bring xpertSea MAX onto your farm, contact us at info@xpertsea.com.